Levels of Perspective: The Process – Creating a Process Map

In my last post, we took a moment to define what a process is and discuss many of its various components. Now let us take this a step further. In this article, I will talk about how I create a process along with some tips that I find helpful to ensure that everyone clearly understands how to read it effectively.
Technique 6: Process Mapping
How to create a process map
Before we dive into how to create a process map, I would like to discuss the different methodologies/modeling standards, types and formats that are out there. Depending on the process you want to document, or the organizational culture/expectations in regards to documenting processes, you could use many of these in your career. We will not be going into extensive detail in either of the of the below, but I do want to highlight the differences.
Different modeling methodologies/modeling standards
- Unified Modeling Language (UML) – This particular modeling language was created as a standard on how to visual a process. There are many different diagrams that leverage UML, such as activity models.
- Business Process Modeling Notation (BPMN) – This particular notation created standards on how to document process models using standard documentation symbols like activities, gateways, and more.
Different modeling formats
There are different layouts on how to document a process. The two most common are flowcharts and swimlanes.- Flowchart – a flowchart is a process map with basic flowchart shapes.
- Swimlanes – a process flows that is documented in lanes, like a swimming pool. Those lanes can be horizontal or vertical. The lanes have special names that denote the role/system conducting the activities in that lane of the process.
Step to Create a Process Map
Now that we have those two items out of the way let’s discuss how to create a process map. Here are some steps I take before I get to creating the actual process map:
- Modeling Standard: Determine the modeling standard to be used to create the process map. We discussed some options above.
- Tool: Determine the tool to be used to create the process map. For my example, I will be using iGrafx as my tool for my example. However, there are other tools like Visio that can be leveraged.
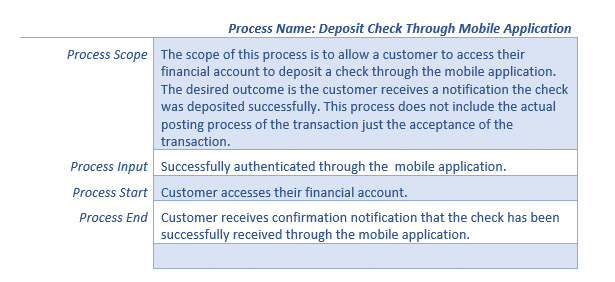
- Process Name: Define the name of the process that will accurately describe the process being mapped. Make sure the name starts with a verb and is very succinct.
- Process Scope: Define the scope of the process. Ensure the scope clearly articulates the starting and ending points of the process. This is your boundary to ensure you clearly document the process, and not go beyond that.
- Process Trigger: Determine what triggers the process to start, and what is the desired outcome.
- Process Start and End: Place you start and end points on the process map. This will also help you to stay focused as you create the process map, in addition, to not having a situation where you have activities that are just dangling out there in space ????. Depending on the tool you are using I would recommend that you make a comment on the start and end points to determine what causes the process to start and what is the desired end state. Again, just some additional tips to keep you focused on the process at hand.
Identify the Following
- Process Activities/Workflow: Start identifying the activities:
- The process should not begin with a decision point. There is some activity that needs to occur prior to a decision being made.
- Determine what the first step is after the process is triggered.
- Continue to ask yourself, “what happens next? Keeping true to the desired end state. You may find that you have subprocesses that arise from the activities. A subprocess is a process within a process. Make sure to capture those appropriately on your process map. Depending on the tool you may be able to choose a certain shape icon to place on the map that denotes a subprocess. If not, you may want to make the outer line of the activity step darker or thicker to demonstrate that this is a sub-process. There should be another process map that describes the steps in the sub-process.
- If you have a decision point ensure you are clear on the paths, and what should occur from the decision point. When you document the alternate paths do not get so granular you go outside the scope of your process. Remember, your start and end points define your boundary.
- Peer Review/Review with Stakeholders: Definitely have someone review the process map to ensure it flows logically and there are no gaps or concerns.
I have attached a simple process map as a sample:

Tips: Process Mapping
Some tips I have learned as I have been process mapping for quite some time:
- Naming Conventions – Process Names should begin with a “verb/noun” phrase and activity steps should begin with a “verb”.
- Do not process map business rules – If you have a lot of decision points in your process map you may be getting to granular. For example, if you have a process where there are rules that have to be evaluated before the process moves forward, do not try to document every rule that could occur. It makes the process map hard to follow. If the individuals consuming the process map cannot easily follow it there is a chance, they will not leverage the documentation at all. Remember the purpose of creating any document is to add value to the organization and those consuming it.
Keep the Rule of 15
- 15 +/- 2 – I try to keep to the rule of 15 activity steps plus or minus 2. So, you could have 13 or 17 steps in a process map. The reason I start with this rule is to ensure I’m not getting to granular in the process to where the stakeholders will get lost in it. If you need more granularity, make sub processes as opposed to trying to fit everything in one long process. This also requires you to really think about the high-level activities that are conducted in the process.
- Lines – there should not be lines in a process map that do not have a line coming in and out of that shape, unless it is the start, end or document symbols. Make sure all activities and decisions points have a line in and a line out.
- Numbering of the Shapes – in most cases I would recommend numbering the shapes once the process map is final and not before. It will make rework less.
- Documentation Symbol – if you choose to use the document symbol in most cases the document symbol will connect to an activity shape but not necessarily be part of the process workflow as a sequential step. There are exceptions to this rule though, as I have found there are times where you need a certain document as an input into an activity in the process map. The is more an exception than a rule.
Now that we understand what goes into creating a process map, in my next post, we will discuss how to analyze existing processes.